概述
這個職業核心機制是新加入了揮發冰瓶,將所有來源的中毒幾率轉化為酸液瓶的凍傷幾率。凍傷是一種持續傷害效果,造成冰冷屬性傷害並增加20%被凍結的幾率。基礎傷害為36點,持續3秒。
凍傷可以無限疊加,但只有前30層能增加被凍結的幾率。凍傷受到酸液瓶技能樹和屬性(敏捷)的加成,主要通過爆炸陷阱來投擲酸液瓶,以此作為主要的凍傷施加手段,同時注重提高Prefix投擲攻擊速度、凍傷基礎傷害和Prefix冰霜抗性穿透。
此外,獵鷹夥伴能夠投擲酸液瓶和黯影之刃,帶來大範圍的爆炸和凍結效果,對敵人造成毀滅性打擊。
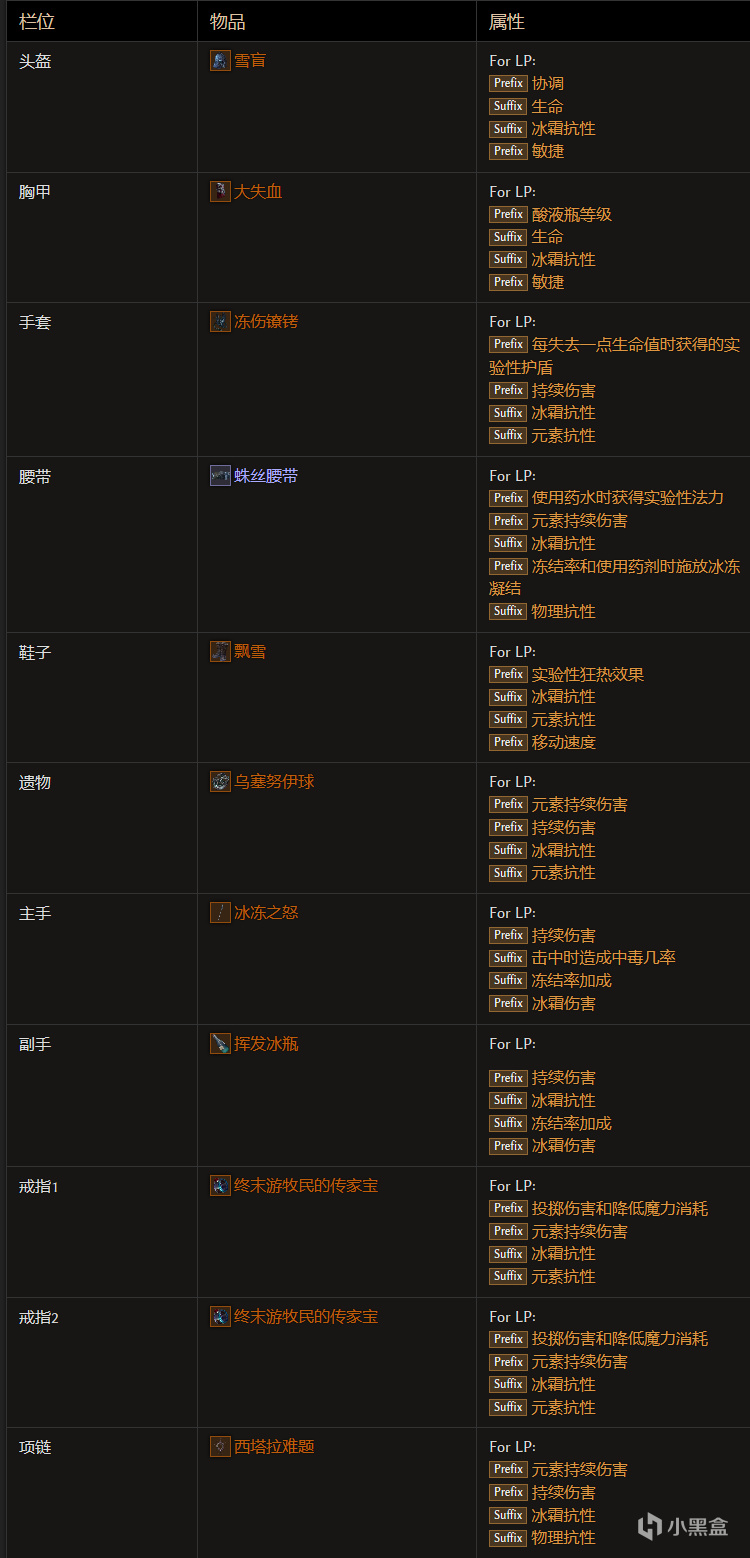
核心裝備包括凍傷鐐銬、飄雪、揮發冰瓶,以及為了轉變為低生命值職業所需的大失血和至少t5 Prefix每失去一點生命值時獲得的實驗性護盾在凍傷鐐銬上。
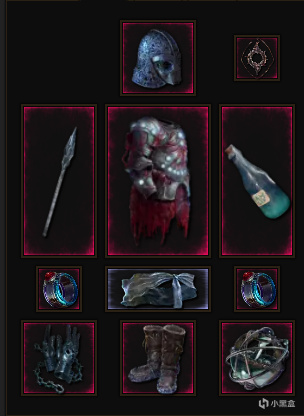
裝備
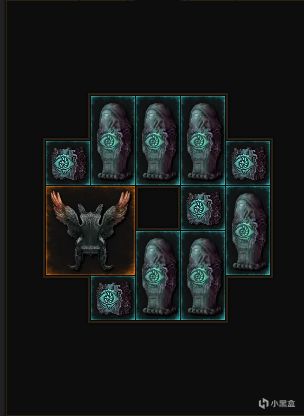
神像

祝福
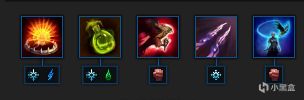
技能
優點/缺點
優點
- 保持穩定輸出。
- 高機動性,幾乎永久的急速和短至3秒冷卻的移動技能空域襲擊。
- 飄雪提供雙加成Prefix冰霜抗性穿透和免疫學。
- 幾乎能夠躲避所有攻擊。
- 超過100%的閃避率。
- 酸液瓶帶來的多種控制效果:凍結、寒冷、虛弱、緩慢、致盲。
- -提速尾流和躲避技能帶來傷害減免。
- 無需關注Suffix暴擊避免和Suffix耐傷。
缺點
- 依賴於爆炸陷阱的連續施放。
- 如果法力不足,需要依賴藥水來恢復。
- 護盾維持能力一般。
- 在沒有理想裝備的情況下,難以堆滿所有抗性。
- 沒有高Prefix投擲攻擊速度時,操作性較差。
- 在完全體之前,刷Boss的速度較慢。
- 不適合硬核模式。
手法/機制
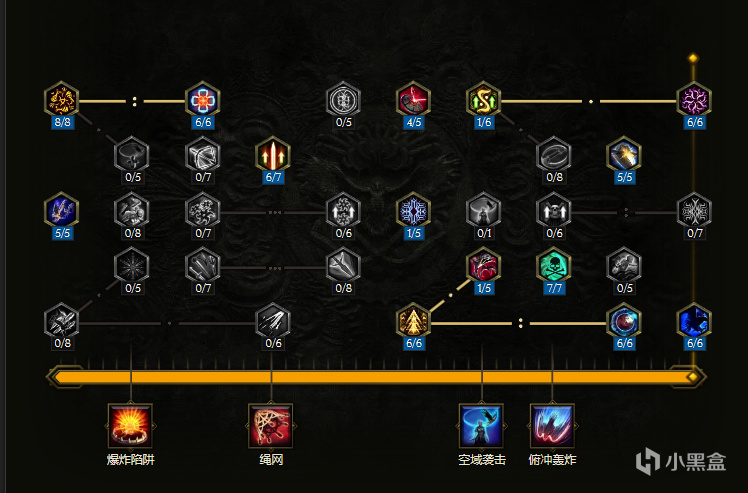
遊戲玩法主要圍繞爆炸陷阱的連續施放,以此來投擲儘可能多的酸液瓶。每次爆炸陷阱可以投擲5個酸液瓶,攻擊速度越快,就能越快地施放陷阱,最多每秒施放3個陷阱。
傷害來源有四個方面:
- 酸液瓶的持續傷害。
- 爆炸陷阱的冰凍傷害。
- 黯影之刃的冰凍傷害。
- 傷害的主要來源:凍傷的持續傷害
使用酸液瓶來觸發毒液池和劇毒水池,對抗更強大的敵人,通過削弱打擊來恢復法力。
儘可能頻繁地使用空域襲擊生成護盾(相當於缺失生命值的50%),施加虛弱效果,從重振決心中恢復法力。
當敵人的生命值降至16%時,使用獵鷹打擊可以秒殺。
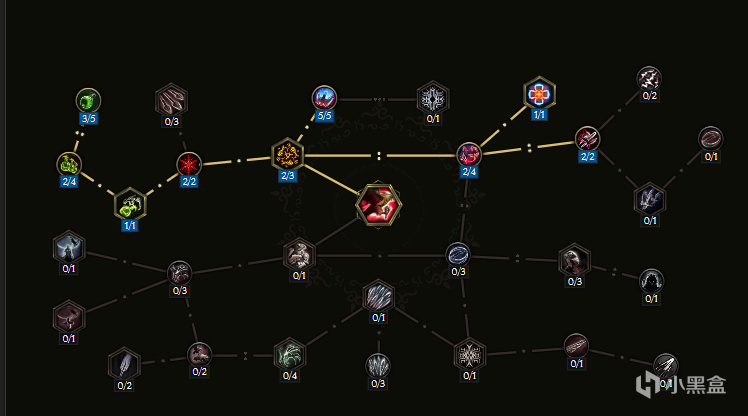
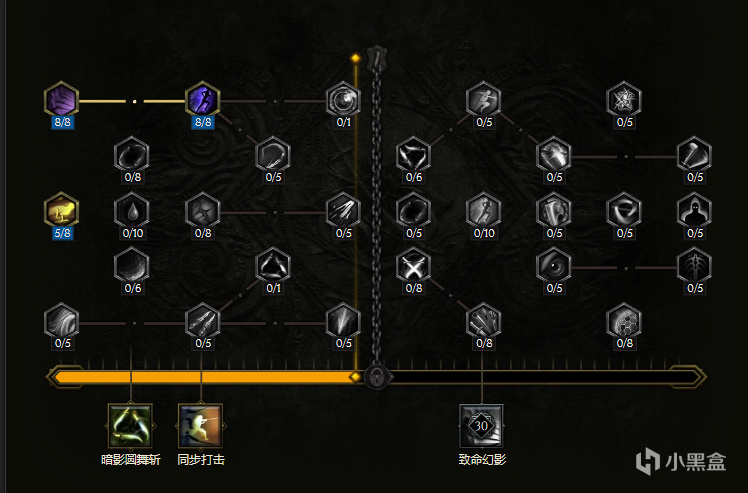
黯影之刃的作用
不需要手動施放黯影之刃,獵鷹會在每次空域襲擊時自動召喚3把刀刃。每次施放會消耗額外的6點法力(加上空域襲擊本身的6點法力消耗,總共12點),但可以從重振決心中恢復9%,約等於白嫖。
黯影之刃與冰冷傷害、敏捷和投擲攻擊傷害有關,遺憾的是沒有持續傷害加成。主要擴展凍傷的持續傷害,BD中仍然有超過400%的冰冷傷害,加上野望寶座的堆疊和50點敏捷。
黑暗邊緣非常強大;當暮色帷幕堆疊時,可以獲得高達1百萬的黯影之刃每秒傷害提示(作為直接傷害技能,在純持續傷害BD中相當不錯)。
來自易爆之刃的冰冷碎片爆炸將施加凍傷。毒素不會將其轉換為凍傷,因為那隻適用於酸液瓶,但加上來自揮發冰瓶的"凍結率加成"的85%,仍然擁有超過250%的凍傷幾率。
獵鷹在每次使用空域襲擊時能扔出3把黯影之刃,而這個技能的冷卻時間超級短,只要3.1秒或更少。這些飛刀會自動尋找敵人,追著它們持續4.8秒(但如果你再次使用空域襲擊,飛刀會跟著你移動),然後“砰”地一聲爆炸,造成冰火兩重天的碎片爆炸,這傷害隨著飛刀在空中飄的時間越長就越厲害,這就是痛苦爆炸的效果,還能從厭惡效果中找到敵人。它們還能用霜降打擊讓敵人凍得瑟瑟發抖,減速不已。我發現用黯影之刃清小怪速度快,打Boss的傷害也比扔煙霧彈和爆炸陷阱來得高,不過就是稍微脆皮了點。我們會選擇爆炸版本的技能,這樣爆發力更強。
另一個選擇是讓刀刃在撞到敵人後繼續旋轉,這樣就要加滿鋼鐵洪流技能的4級,同時不用易爆之刃和痛苦爆炸。這種旋轉的刀刃風暴能持續4.8秒,每秒打3下,而且不受攻擊速度的影響。但是,一次只能有一把刀刃擊中一個敵人,這在打Boss時就有點虧了。而且,如果你再次使用空域襲擊,之前的3把刀刃會跟著你移動,而碎片爆炸則是飄得越久,傷害越高。所以,打Boss時,能讓3把刀刃都擊中Boss的爆炸設置顯然更有優勢。根據我們測試的結果,爆炸設置在打Boss時的DPS(每秒傷害)更高。
如何維持法力
- T7 Prefix投擲傷害和降低魔力消耗戒指x2將使酸液瓶的成本為0,爆炸陷阱為12,黯影之刃每次施放2點。
- 在腰帶上使用Prefix使用藥水時獲得實驗性法力。
- 削弱打擊 x 直接酸液瓶施放(在生命值構建中使用埃萊科的放棄時,價值翻倍),6/6 漫遊者的毅力,重振決心,獵手的戰利品。
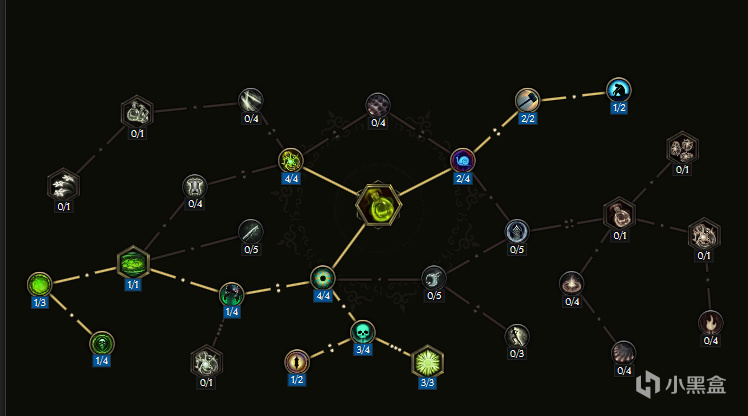
獵鷹的作用
在這個構建裡,獵鷹就是我們的得力助手,它能給咱們加個buff,叫做飛翼警覺,能讓咱們的移動速度和攻擊速度提升15%,持續時間長達5秒,而且這個buff基本上能一直用著。獵鷹還能用個技能叫獵鷹打擊,變身成猛禽之姿,對血量高的敵人能造成額外16%的傷害,哪怕Boss也照砍不誤。另外,它的毒液池技能還能增強我們的劇毒水池,讓持續傷害效果提高10%,還能通過獵手的戰利品給我們回點法力,而且它的酸液瓶還能額外給我們疊幾層凍傷。
獵鷹每6秒會自動扔一個酸液瓶,而且每次我們主動扔酸液瓶的時候,有75%的幾率能立馬恢復一個能量,這樣就能保持飛翼警覺的buff不斷。它還能在每次空域襲擊的時候,額外扔出3把黯影之刃。不過說實話,獵鷹的傷害跟我們的輸出比起來就有點小巫見大巫了。
而且,如果我們給獵鷹加滿了2級的標記打擊,它扔酸液瓶的時候還有40%的幾率觸發飛翼警覺的buff。所以,要想保持buff不斷,我們得經常主動扔酸液瓶,不然的話,獵鷹就只能每6秒才恢復一個能量,那樣buff就維持不住了。
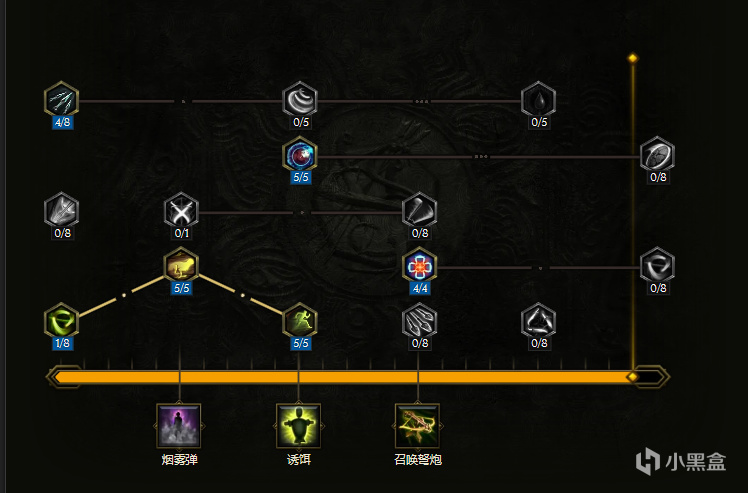
技能
對於爆炸陷阱,所有的天賦節點都很重要,如果想快速點滿的話,首先要加陷阱噴灑器、陷阱拋投機和鍊金術士之工具,這樣可以每次施放多扔幾個酸液瓶,然後再考慮法力效率的傑爾霍爾的藍圖,最後在左側加點增加陷阱數量的特帕斯、寒潮地雷和靜態地雷。而灰燼之艙是我們唯一獲取粉碎冰霜抗性的方式,可以疊加到10層,只需要加1點就行。
至於酸液瓶,如果裝備上沒有T7酸液瓶技能等級加成,那麼就把大失血上的衰弱、輕量級和妨害混合物這幾個天賦點給去掉。
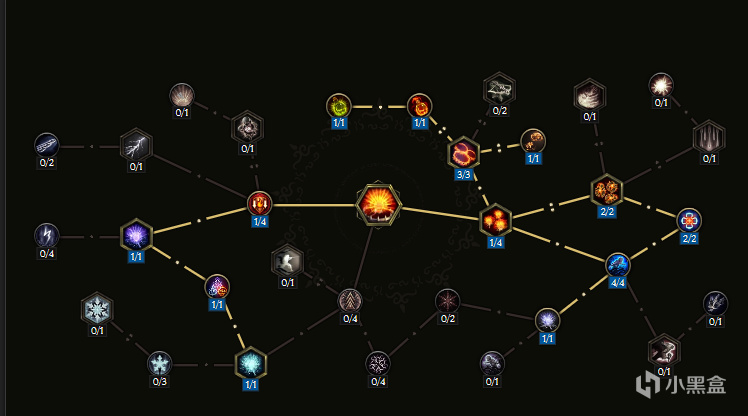
爆炸陷阱 (20)
酸液瓶 (24)
馴鷹術 (20)
黯影之刃 (20)
空域襲擊 (20)
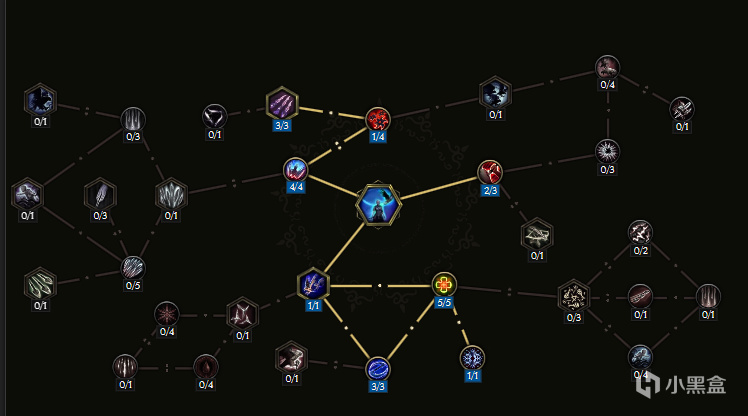
被動天賦
在偏斜與編織中拿4點,因為不想將所有的Prefix格擋幾率轉換為閃避攻擊;免費獲得了9%的格擋幾率!
側翼打擊的額外獎勵是一個6%的傷害乘數,並且會由酸液瓶妨害混合物施加的多達3層的緩慢效果觸發。
加上韌性,基礎的躲避打擊幾率能達到90%。
使用削弱打擊時,如果直接施放酸液瓶擊中敵人,能額外恢復一些法力。
暮色帷幕配上煙霧陷阱,簡直是保命神技,經常能給超過80%的完全閃避和100%的躲避打擊幾率。
每1%的前綴移動速度會轉換成1%的傷害,來自靈活,用追尋、提速尾流和猛禽之翼,既能加快清理速度,又能增加傷害,一舉兩得。
在偏斜與編織上加4點,因為不想把所有的前綴格擋幾率都轉換成躲避打擊;還能白拿9%的格擋幾率!
側翼打擊的額外加成是6%的傷害倍增器,最多可觸發3個有減速效果的酸液瓶妨害混合物。
遊俠(24)
刀刃舞者(21)
馴鷹者(68)
裝備
神像

祝福

升級/開荒階段
如果你是剛開始玩,搞個水晶魔杖就行,這玩意兒自帶法力加成和四次傷害,而且高級的前綴投擲傷害和減少魔力消耗雖然難找還貴,但用這個魔杖能讓你在升級路上輕鬆不少。
如果你用的是虛空之心(CoF),那就不用
如果你是冰霜之魂(MG),那就直接買個0層的揮發冰瓶,轉冰屬性攻擊,便宜得很!
獵鷹在你升級的時候能幫你打不少傷害,因為你用爆炸陷阱的時候攻擊速度會慢一些。不過要注意,隨著你法力維持能力的提升和投擲攻擊速度的增加,獵鷹的傷害就會慢慢減少。
如果你早期能搞到個流血之心,那就太好了,儘量找個生命偷取在8.5%到9%之間的。先把這個裝備至少弄到T7級別的前綴元素持續傷害。再配上高階·瑞耶之怒,你就能在遊戲裡輕鬆過關,基本不用擔心掛掉。
後期/終局遊戲階段
在腐敗值1000+的環境下,得特別注意那些元素攻擊,比如火焰、金色噴霧、冰霜呼吸、中毒持續傷害和流放法師的旋轉光束,這些通常都是能秒殺你的招數。所以在回聲和Boss戰中,你大多數時間都在躲避攻擊。對付多個敵人最好的辦法是,用爆炸陷阱和酸液瓶放風箏,然後配合獵鷹打擊的16%執行傷害幹掉它們。
用低生命值BD的時候,要儘量在爆炸陷阱連發之間多用空域襲擊來堆疊守衛。放風箏打怪會比直接扔爆炸陷阱慢很多,因為失去了85%施加凍傷的機會;酸液瓶先是物理攻擊然後是冰冷持續傷害,但你要儘可能多地在它們身上用爆炸陷阱,以獲得最大的傷害。
早期腐敗值的裝備在腐敗值1000+的時候仍然有效,這得益於高額的冰霜穿透。
原文鏈接:
Low Life Cold Acid Flask Falconer Build Guide (Version 1.0.3) - Last Epoch (lastepochtools.com)
戰利品過濾器
Cold Acid Flask Starter Life Build 6 16 1.0.4 2 HIDE </conditions> <color>0</color> <isEnabled>true</isEnabled> <levelDependent>false</levelDependent> <minLvl>0</minLvl> <maxLvl>0</maxLvl> <emphasized>false</emphasized> <nameOverride /></Rule><Rule> <type>HIGHLIGHT</type> <conditions> <Condition i:type="AffixCondition"> <affixes> <int>67</int> <int>11</int> <int>14</int> <int>100</int> <int>72</int> <int>507</int> <int>87</int> </affixes> <comparsion>ANY</comparsion> <comparsionValue>0</comparsionValue> <minOnTheSameItem>1</minOnTheSameItem> <combinedComparsion>ANY</combinedComparsion> <combinedComparsionValue>1</combinedComparsionValue> <advanced>false</advanced> </Condition> </conditions> <color>0</color> <isEnabled>true</isEnabled> <levelDependent>false</levelDependent> <minLvl>0</minLvl> <maxLvl>0</maxLvl> <emphasized>false</emphasized> <nameOverride /></Rule><Rule> <type>HIGHLIGHT</type> <conditions> <Condition i:type="AffixCondition"> <affixes> <int>67</int> <int>11</int> <int>14</int> <int>100</int> <int>72</int> <int>507</int> <int>87</int> </affixes> <comparsion>ANY</comparsion> <comparsionValue>0</comparsionValue> <minOnTheSameItem>2</minOnTheSameItem> <combinedComparsion>ANY</combinedComparsion> <combinedComparsionValue>1</combinedComparsionValue> <advanced>false</advanced> </Condition> </conditions> <color>12</color> <isEnabled>true</isEnabled> <levelDependent>false</levelDependent> <minLvl>0</minLvl> <maxLvl>0</maxLvl> <emphasized>false</emphasized> <nameOverride /></Rule><Rule> <type>HIGHLIGHT</type> <conditions> <Condition i:type="AffixCondition"> <affixes> <int>67</int> <int>11</int> <int>14</int> <int>100</int> <int>72</int> <int>54</int> <int>16</int> </affixes> <comparsion>ANY</comparsion> <comparsionValue>0</comparsionValue> <minOnTheSameItem>3</minOnTheSameItem> <combinedComparsion>ANY</combinedComparsion> <combinedComparsionValue>1</combinedComparsionValue> <advanced>false</advanced> </Condition> </conditions> <color>2</color> <isEnabled>true</isEnabled> <levelDependent>false</levelDependent> <minLvl>0</minLvl> <maxLvl>0</maxLvl> <emphasized>true</emphasized> <nameOverride /></Rule><Rule> <type>HIGHLIGHT</type> <conditions> <Condition i:type="AffixCondition"> <affixes> <int>67</int> <int>11</int> <int>14</int> <int>100</int> <int>72</int> <int>17</int> <int>16</int> <int>54</int> </affixes> <comparsion>ANY</comparsion> <comparsionValue>0</comparsionValue> <minOnTheSameItem>4</minOnTheSameItem> <combinedComparsion>ANY</combinedComparsion> <combinedComparsionValue>1</combinedComparsionValue> <advanced>false</advanced> </Condition> </conditions> <color>8</color> <isEnabled>true</isEnabled> <levelDependent>false</levelDependent> <minLvl>0</minLvl> <maxLvl>0</maxLvl> <emphasized>true</emphasized> <nameOverride /></Rule><Rule> <type>SHOW</type> <conditions> <Condition i:type="AffixCondition"> <affixes> <int>67</int> <int>11</int> <int>14</int> <int>100</int> <int>72</int> <int>105</int> <int>107</int> <int>110</int> <int>140</int> </affixes> <comparsion>ANY</comparsion> <comparsionValue>0</comparsionValue> <minOnTheSameItem>1</minOnTheSameItem> <combinedComparsion>ANY</combinedComparsion> <combinedComparsionValue>1</combinedComparsionValue> <advanced>false</advanced> </Condition> <Condition i:type="SubTypeCondition"> <type> <EquipmentType>IDOL_1x1_ETERRA</EquipmentType> <EquipmentType>IDOL_1x1_LAGON</EquipmentType> <EquipmentType>IDOL_2x1</EquipmentType> <EquipmentType>IDOL_1x2</EquipmentType> <EquipmentType>IDOL_3x1</EquipmentType> <EquipmentType>IDOL_1x3</EquipmentType> <EquipmentType>IDOL_4x1</EquipmentType> <EquipmentType>IDOL_1x4</EquipmentType> <EquipmentType>IDOL_2x2</EquipmentType> </type> <subTypes /> </Condition> </conditions> <color>0</color> <isEnabled>true</isEnabled> <levelDependent>false</levelDependent> <minLvl>0</minLvl> <maxLvl>0</maxLvl> <emphasized>false</emphasized> <nameOverride>MASTER RULE</nameOverride></Rule><Rule> <type>HIGHLIGHT</type> <conditions> <Condition i:type="AffixCondition"> <affixes> <int>67</int> <int>11</int> <int>14</int> <int>100</int> <int>72</int> <int>105</int> <int>107</int> <int>110</int> <int>140</int> </affixes> <comparsion>ANY</comparsion> <comparsionValue>0</comparsionValue> <minOnTheSameItem>2</minOnTheSameItem> <combinedComparsion>ANY</combinedComparsion> <combinedComparsionValue>1</combinedComparsionValue> <advanced>false</advanced> </Condition> <Condition i:type="SubTypeCondition"> <type> <EquipmentType>IDOL_1x1_ETERRA</EquipmentType> <EquipmentType>IDOL_1x1_LAGON</EquipmentType> <EquipmentType>IDOL_2x1</EquipmentType> <EquipmentType>IDOL_1x2</EquipmentType> <EquipmentType>IDOL_3x1</EquipmentType> <EquipmentType>IDOL_1x3</EquipmentType> <EquipmentType>IDOL_4x1</EquipmentType> <EquipmentType>IDOL_1x4</EquipmentType> <EquipmentType>IDOL_2x2</EquipmentType> </type> <subTypes /> </Condition> </conditions> <color>12</color> <isEnabled>true</isEnabled> <levelDependent>false</levelDependent> <minLvl>0</minLvl> <maxLvl>0</maxLvl> <emphasized>false</emphasized> <nameOverride>MASTER RULE</nameOverride></Rule><Rule> <type>HIGHLIGHT</type> <conditions> <Condition i:type="AffixCondition"> <affixes> <int>67</int> <int>11</int> <int>14</int> <int>100</int> <int>72</int> <int>105</int> <int>107</int> <int>110</int> <int>140</int> </affixes> <comparsion>ANY</comparsion> <comparsionValue>0</comparsionValue> <minOnTheSameItem>3</minOnTheSameItem> <combinedComparsion>ANY</combinedComparsion> <combinedComparsionValue>1</combinedComparsionValue> <advanced>false</advanced> </Condition> <Condition i:type="SubTypeCondition"> <type> <EquipmentType>IDOL_1x1_ETERRA</EquipmentType> <EquipmentType>IDOL_1x1_LAGON</EquipmentType> <EquipmentType>IDOL_2x1</EquipmentType> <EquipmentType>IDOL_1x2</EquipmentType> <EquipmentType>IDOL_3x1</EquipmentType> <EquipmentType>IDOL_1x3</EquipmentType> <EquipmentType>IDOL_4x1</EquipmentType> <EquipmentType>IDOL_1x4</EquipmentType> <EquipmentType>IDOL_2x2</EquipmentType> </type> <subTypes /> </Condition> </conditions> <color>4</color> <isEnabled>true</isEnabled> <levelDependent>false</levelDependent> <minLvl>0</minLvl> <maxLvl>0</maxLvl> <emphasized>false</emphasized> <nameOverride>MASTER RULE</nameOverride></Rule><Rule> <type>HIGHLIGHT</type> <conditions> <Condition i:type="AffixCondition"> <affixes> <int>67</int> <int>11</int> <int>14</int> <int>100</int> <int>72</int> <int>105</int> <int>107</int> <int>110</int> <int>140</int> </affixes> <comparsion>ANY</comparsion> <comparsionValue>0</comparsionValue> <minOnTheSameItem>4</minOnTheSameItem> <combinedComparsion>ANY</combinedComparsion> <combinedComparsionValue>1</combinedComparsionValue> <advanced>false</advanced> </Condition> <Condition i:type="SubTypeCondition"> <type> <EquipmentType>IDOL_1x1_ETERRA</EquipmentType> <EquipmentType>IDOL_1x1_LAGON</EquipmentType> <EquipmentType>IDOL_2x1</EquipmentType> <EquipmentType>IDOL_1x2</EquipmentType> <EquipmentType>IDOL_3x1</EquipmentType> <EquipmentType>IDOL_1x3</EquipmentType> <EquipmentType>IDOL_4x1</EquipmentType> <EquipmentType>IDOL_1x4</EquipmentType> <EquipmentType>IDOL_2x2</EquipmentType> </type> <subTypes /> </Condition> </conditions> <color>9</color> <isEnabled>true</isEnabled> <levelDependent>false</levelDependent> <minLvl>0</minLvl> <maxLvl>0</maxLvl> <emphasized>false</emphasized> <nameOverride>MASTER RULE</nameOverride></Rule><Rule> <type>SHOW</type> <conditions> <Condition i:type="RarityCondition"> <rarity>UNIQUE EXALTED</rarity> </Condition> </conditions> <color>0</color> <isEnabled>true</isEnabled> <levelDependent>false</levelDependent> <minLvl>0</minLvl> <maxLvl>0</maxLvl> <emphasized>false</emphasized> <nameOverride /></Rule><Rule> <type>SHOW</type> <conditions> <Condition i:type="AffixCondition"> <affixes /> <comparsion>MORE_OR_EQUAL</comparsion> <comparsionValue>7</comparsionValue> <minOnTheSameItem>0</minOnTheSameItem> <combinedComparsion>ANY</combinedComparsion> <combinedComparsionValue>7</combinedComparsionValue> <advanced>true</advanced> </Condition> </conditions> <color>0</color> <isEnabled>true</isEnabled> <levelDependent>false</levelDependent> <minLvl>0</minLvl> <maxLvl>0</maxLvl> <emphasized>false</emphasized> <nameOverride>SHOW T7 Gear</nameOverride></Rule>